A while ago I discovered Minecraft4k, a java demo written by Notch fitting into a 4kb object file. He used software raycasting to rasterize a large 3d array of voxels. The original demo can be played here as an applet:
Years ago I found a interesting library called TinyCC, which provided a simple and small C compiler with one major twist… it can be embedded inside another application. Because of this, a program can compile new functions for itself at run time and call them using function pointers. In a sense it can be used like an immensely powerful scripting language, with the benefit that there is no speed hit due to interpretation or emulation. Its weakness as a scripting language is that you have to account for portability and security problems due to the execution of these ‘scripts’ running as native code on the host processor.
So far, I have used TinyCC for a few projects in the past and recently in a texture generator as well as my text adventure engine. The reason for this post however, is that TinyCC is not the most intuitive thing to embed into a windows application, so I wanted to take a moment to explain one clean method to do so.
There is no static library for use with visual C++ so that option is out, however since a fully compiled DLL file is included in the download package, it seemed that it would be easiest to dynamically link the DLL through code at run time. This requires loading the DLL and requesting all of the functions that are exported from it which is a fairly easy operation on any platform and generally differnt OS’s have much the same interface for doing so. The only tricky part is actually specifying all of the annoying function pointer casts correctly during binding.
Without farther talk, here is some straight forward code to load TinyCC and bind the interface for you. Which I hope it should all be fairly straight forward and easy to understand.
Recently my girlfriend asked me if I would help her program a text adventure. She has wanted to learn the program in C for a long time and also has been looking for a project we could work on together. I thought this was an awesome idea, so I set about programming a basic shell of an adventure engine for her to work with. I wanted to take the load off her so she can focus on developing the story rather then dealing with blitting, messaging, etc.
I managed to pack the entire DOS font of 256 characters in to 3k of space and embed it into the program, which was pretty cool, so each bit encodes only one pixel. I could perhaps have achieved more using RLE but there really isn’t any need to go that far.
My library emulated a console screen of 40×20 characters. It has a cursor that can be moved, text and symbols can be written to the screen and it handles user input, so in short, all of the basics for a text adventure. There is no scrolling implemented yet however since that didn’t seem necessary. Conceivably an awesome rogue like could be easily written with this library.
Plain text however just seems too digital and static. I wanted something more like and old analogue CRT monitor with a little too much interference, and misaligned deflection coils. So a second achievement was to finally get around to writing my ‘ghetto blur’ as suggested long ago for my yet unnamed dungeon game. I managed to do this efficiently using some cool tricks, using only ANDs, ORs and shifts. It looks fairly retro and below you can see it for yourself, however the magic is seeing it animated as it subtly flickers and wobbles.
Today I pointed my browser towards The TIGSource website and saw a fresh post directing readers to a kickstarter for TinyKeep. While I am not exactly interested in the game itself, one thing on the site caught my eye. The team have developed an interactive demo for their random dungeon creation algorithm, and I really like it. It can generate nice looking dungeons, and the concepts it uses seems reasonably understandable. I wasn’t satisfied with just observing the demo to try and infer how it operates so I decided to take a peek under the hood.
I downloaded the flash object and pointed a shockwave flash decompiler at it, to find ~6000 lines of code. I guess that is because the decompiler doesn’t discriminate between linked libraries and regular program code.
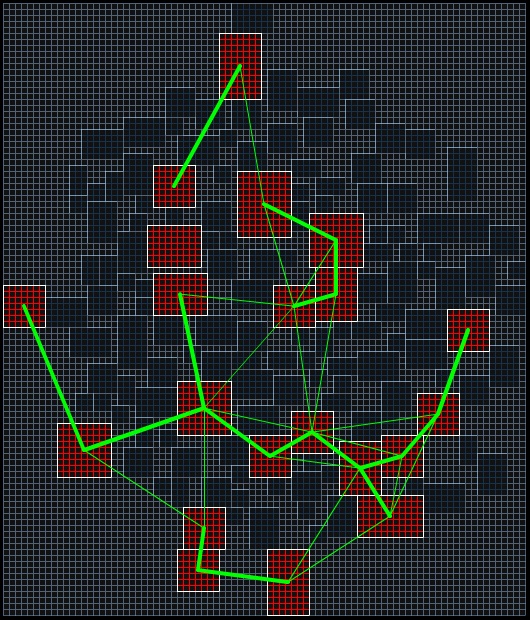
Above is a picture taken nearing the end of the generation process. At this point it seems links are added until a minimum spanning tree is available or something, being highlighted by the thicker green lines.
The source is not as immediately helpful as I wanted it to be, but it turned up a few interesting hints. There is a mention of minimum spanning trees, which I remember casually skipping over while digesting my algorithms book. I have however since read that chapter again this morning, and now I have a pretty good idea of how these concepts can be used in this context.
So my task in building the Tengu Engine will be stalled for just a moment while I play with my own implementation and variation of this algorithm. In fact, procedural level creation is something that I haven’t read about actively so perhaps this algorithm is already well known, but being a feet first kind of person, I rather fancy just coding up my own before researching this stuff.
Again, I have produced a small demo of the Tengu Engine as my own way of experimenting with what may be possible as it progresses along its development path. While work is already under way on the hardware renderer, it still has not been integrated into the main code so this demo here still uses SDL for all of the rendering. What it shows is a top down perspective using a destroyed space ship tile set I made recently. There are ray traced shadows as well as what I refer to as gradients, or distance based mask pattern selection, to give the illusion of light or visibility falloff, which is a technique somewhat similar to dithering I suppose.
I have been working on some tiles for this project today to help me define a more solid overall look of the game. The task for today will be to update the engine to support custom maps and these nice tiles. The water rendering is also coming along so I am hoping I can have these things integrated by tomorrow.
Also, something that I have rarely seen in a platform game is genuine AI companions that can join the player on their journey. I guess this is in part due to the fact that it can be hard to create an AI that can navigate and jump between platforms properly, however I have devised what could be a great solution to this problem.
One of my ambitions for a while was to create my own efficient ray casting function which I finally managed yesterday, which is great news because ray casting has so many cool applications. There are so many basic uses for ray casting, for instance, in line of sight detection in the field of AI, detecting the collision points when shooting bullets and importantly for my game, detecting where to attach grappling hooks. More advanced uses could be in inverse kinematic routines, procedural animation systems or even, as I eventually want to try, Wolfenstein style 2.5D ray-casting engines. With some extensions It should be possible to modify a ray-casting algorithm to perform somewhat naive Voxel rendering, which is something else I really want to try. Ever since I played Voxatron, I have since fallen in love with Voxels and its on my large project list to make something simmilar.
Over the last few years I have studied a large number of ray-casting algorithm available on the web and read many websites on the subject. I would be lying if I said I really understood all of the approaches I have seen to ray-casting, but it is clear that the efficiency of them varies quite substantially, and in this regard they are easily examined.
Perhaps the most understandable and readable tutorial for ray-casting I could find was here, in article by Lode Vandevenne. On the face of it, his algorithm seems very efficient and he talk in detail about the efficiency and speed concerns, and even in the main loop there is no multiply or divides used. However, in exploring the code we can see that to initialize a ray cast, two square route functions are called, which adds up when you consider that two called are made for each vertical column of the screen. Thus even at 320×240, 640 square route calls are made in rendering one frame. Square route calls can be optimized somewhat by approximation, or look-up tables, however this seems still like a weak point of the algorithm.
Another nice tutorial can be found here, written by F. Permadi. In his tutorial he advocates mostly the same strategy as the above, but the formers square route calls are now replaced with a call to the tangent function, shown here. This is more efficient, since the tangent function can easily be packed into a look-up table and accessed quite efficiently, just as I did for my sin wave approximation library. Still this look-up costs space and has accuracy tradeoffs thus reducing the overall efficiency in other ways.
For my algorithm, I managed to avoid square routes and look up tables of any kind, in fact there are just four divides and six multiplies called for each ray cast, the rest being just addition and subtraction. The inner loop is entirely performed using addition and subtraction also, so the overall efficiency seems bloody high. I do however test inside the inner loop to see if the ray has exited the map space, but if we can guarantee that a ray will hit a tile (such is the case, when the map is surrounded by tiles) then efficiency could again be dramatically increased by omitting these tests. In the code below that I provided, you will find there is one multiply in each inner look, to perform the wall hit test, but this can be optimized away to equivalent addition and subtraction, as I have done in my own personal version. In my scheme unlike that of Lode, I separate the ray cast into two stages, that of ray casting over the x-axis and next the y-axis. Each of these steps may produce a hit, and at the end of the algorithm we can compare the squared distance to efficiently select the closest of the two hits. I also break the ray cast through each axis into two parts, that for a positive increment, and that of a negative, since we can tailor the inner loop to be more efficient for each case.
I am sure this ray casting code will find loads of awesome use in Ninja Flare as well as my other projects. I also need to find a better name for the game, other than Ninja Flare, which was chosen quickly for the deadline of Ludum Dare.
My decision to follow a tile based map representation has led me to explore several things I like in games, and to see how they can be implemented in a tile based world, efficiently and robustly.
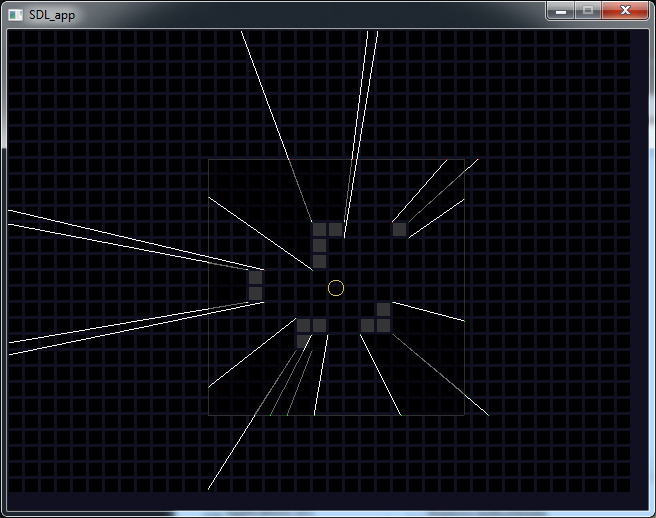
One of the things I have been experimenting with, and love seeing implemented, is a method for computing fast real time 2D shadows. Since I want to take Ninja Flare in a direction towards a ninja stealth game, shadows will be a very welcome addition to the game play. The image above shows the state of my progress in this area. The large outlined grey rectangle represents a conceptual viewing area and thus the limit of the distance of the shadows. In reality some shadow edges project beyond this area because I have not yet implemented any clipping. The yellow circle in the middle of this area represents the light source. The darkening of the shadowed regions was added afterwards in Photoshop only to help give me an idea of the accuracy of my results. In order to complete this method I will need to implement a fast triangle or quad filler to shade all the shadowed regions. This could be done in software if I stick with SDL, or a perhaps easier strategy is to use Direct3D to do the filling for me. One of the nice benefits of the method I came up with for computing these shadows is that it requires no pre-processing so it will react to any changes in the map structure.
I read about a very interesting technique some time ago. A method was proposed for generating a completely random set of low resolution space invader like creatures. The idea was extremely simple and elegant. The key to the technique is its use of symmetry, since the human mind likes to find form and meaning in symmetric things.
For my implementation I chose a size of 5×5 pixels for my invaders and a line of symmetry down the middle. More specifically, the first three pixels of each row are random, and the last two are mirrors of the first two. For this technique I implemented my own pseudo random number generator using a linear feedback shift register technique. The color of each of the invaders shown corresponds to the seed of the random number generator when it was formed. This seed could be used to re-generate any space invader, but this implementation does not support this currently since the seed is 32bits wide and a colour is clearly 3x8bits or 24bits.
It would be great to add this to a game like geometry wars and have all of your enemies procedurally generated, from their visuals down to their abilities. The scope for using this in a retro computer game seem really endless.
I love the Bitmap Brothers, and especially the Chaos Engine (Z is also up there). I have so many fond childhood memories of being at my friends house in front of his Amiga500 getting our asses kicked with that game.
A while ago, I really dedicated myself to remaking The Chaos Engine as best I could. This would be a lesson in sticking with a project, a little longer then just proving a core concept. It would teach me about making the tools used in creation of a computer game. I learned how to program more complex enemy AI then I was used to. An entire engine was also designed and programmed just for this project. i implemented a simple custom scripting language for the game. All blitting operations and audio mixing was also done by hand too. In essence, this was by a long shot the most ambitious project I had ever taken on. Everything is programmed using fixed point math also, there is not a single float used anywhere in the source code. All of the path finding is done using the A* algorithm. Also all the collision checks are optimized by maintaining a quad tree for the entire level.
Below is a video of the project as it was when I finally moved on to work on something else. I don’t feel at all disappointed at having abandoned this project because so much was learned in the process.
One item of note was the players companion AI. That was a very fun challenge to program since it was critical that he should be actually helpful in the game.
At a basic level this character operates by means of a strange state machine and blackboard hybrid. The player can be in only one state at a time. A state can return naturally to another state if it specifies to do so. A state can also at any time be interrupted by a transition to a state of a greater priority.
Each priority level of this AI has an expert associated with it, thus each frame, each expert is contacted to see if it has a plan for the AI. Then the plan of the highest priority is selected as the active pursuit. For this AI there was 6 priorities listed below, highest first.
AVOID (avoid enemies and bullets)
ENGAGE (find a good attacking position if not in one)
SHOOT (fire at the most convenient enemy we can find)
CATCHUP (do not stray too far from the player else follow any path we have)
RETHINK (find a new path to our destination)
PICKUP (collect any coins and bonuses around us)
As you can see from the video, even in this early stage of implementation it already looks quite intelligent at times. The AI sidekick was the last thing I added to the project, but one of my favorite things I have programmed.
I may re-examine some elements of this project later and explore them in more depth since there were many very common programming problems that I found nice solutions too that I would like to share. Also I think I will release all the source code too at some point in the future, as it may be of use to someone else.