Unknown's avatar

Character Design

As well as just programming, I have also been trying to think up some story lines and develop a unique and lively world for my project.  I made some character designs along the way and they can be seen here.  Mostly I wanted to give each one something very unique as a kind of immediate identifier for the player to recognize.  I came up with a few designs I found nice, but not many that I thought were really strong enough to be the player character.  The top left character was just a little joke of mine.

Chars

A couple of these have been animated then placed in the engine, and can be seen in action here.

Unknown's avatar

Water Water Everywhere

An important aspect of many successful platform games is a diversity in their environments.  I spent some time recently creating a nice water effect for any aquatic environments in my game.  The technique used is one that I have had experience with many times before, and can be read about on this great website:

http://freespace.virgin.net/hugo.elias/graphics/x_water.htm

The advantage of the method described is that the water is truly dynamic, allowing ripples and waves can be created at any point on the surface with no speed impact.  This will be important when the player is landing in the water or jumping out of it.  Another advantage is that there is no penalty for having little extras, like waves created by a waterfall that is hitting the waters surface, or little fish creatures jumping in and out of the water.

The original technique was applied as a top down 2D effect which wouldnt be at all suitable since the Tengu engine is for side on platformers.  I therefore have implemented this technique in 1D so that can effectively be run and viewed from the side on perspective.  The raw results of this algorithm can be fairly nasty to look at so I did two things to improve the look of the effect.  Due to the way this water effect operates, it allowed me to update it at a rate less than every frame, and for the in between frames I can then blend between the old state and the new state.  This smooths the animation and gives me a variable control of the speed of animation, which the raw technique never provided for.  The second advancement that I developed was to use cosine interpolation while drawing the water height field and so now the surface appears to have nice round ripples.

I still need to develop A nice final rendering solution to the water so that I really looks great, but as a basis this is a good start.  I made a mockup of the final water render that I want to achieve, and I have also the algorithm in mind that I need to achieve it, so it should easily be possible, and not too slow.  I should also be very much possible that light rays will also really be calculated based on the angle of the water, so this is something that I cant wait to see animated in the engine.

Water

Unknown's avatar

From The Archive 1

I found a build hiding on an old hard disk of the editor for my remake of The Chaos Engine, and I wanted to demonstrate it in action, check it out:

The entire editor was written in C# and served as a great project for learning the language and also as my first proper tool for one of my game projects.

Unknown's avatar

Taking The Particles Apart

I want to take a little time to write about the design and implementation of the particle system for the Tengu Engine. I have programmed particle systems for some of my earlier projects, but they all took a similar approach which suffered from several short comings, as I will explain. My previous systems were all very rudimentary; All of the particles were stored in a large fixed length array, which was entirely updated and rendered once each frame, and as new ones are created they replace the oldest ones in this list. I had also tried a similar technique using a linked list in place of the array, which solves a few of the short comings, however not all of them. Linked lists are generally slower too since many different memory areas have to be accessed in one traversal of all the particles. The problem of using a fixed length list is that it imposes a very hard limit on the number of particles that may exist at any one time. This may be acceptable if the list is large enough, or if there is quite a consistent rate of death and birth.

The linked list approach removes this limit since new items can be added to the list at any time, so we can always add more if we need them. In the simplest implementation, we need to allocate more particles when they are born and de-allocate them when they die, each being a fairly expensive operation. This could be avoided by never de-allocating a particle, and instead, upon its death it is removed from the particle list and added to a list of free particles. When an allocation request comes in, we just pick one from this list of free particles. This has the benefit of being simple and reducing the allocation and de-allocation requests to almost zero for a steady game state. If the free list is empty when we ask for a new particle only then will we have to allocate a new particle, or better still, a bunch of them, adding the excess to the free list to give the system a little head room.

This strategy is in fact something that I may try at some point for a simple project since there are many advantages too it, but there are also some disadvantages that remain. Each particle must store a pointer to the next particle in the list. This increases the particle size by 4bytes for each one, not terrible, but quite wasteful since there are ways to avoid it. Another downside is that memory accesses are fragmented, because the next particle in the list might have been allocated somewhere far away in terms of its memory location. Fortunately both of these problems can be solved, or minimized with one technique, which I will now explain.

I call this technique clustering. Instead of allocating particles on the individual level, I instead allocate many in one go, from the same memory space. In my current implementation I allocate 64 particles at once, but this was just a number picked out of the air. Each cluster forms a linked list, so they can be chained together so that the particles don’t have to have any information about the list they are in. So I ended up with something like this:

//
struct sParticle
{
    float x, y;
    float vx, vy;
    float age;
    // ....
};
//
struct sCluster
{
    sParticle particle[ 64 ];
    sCluster *next;
};
//
struct sEmitter
{
    sCluster *firstCluster;
    float age;
};

I also followed a similar strategy to that mentioned above since a cluster is not de-allocated when all the particles it contains are dead, it merely gets removed and added to a free cluster list instead. When a emitter runs out of free particles and it needs to create new ones, is finds a cluster from the free list and adds it to its own cluster list instead which provides an immediate gain of more free particles giving it some headroom. If the free list is empty then we have to bite the bullet and just allocate a new cluster, or perhaps several at once. Emitter objects are small and created rarely, so for the time being I simple allocate them as they are needed, however they could just as easily have their own free emitter list.

I wanted to retain as much flexibility as possible for the effects that could be created so I also chose to implement callback functions into the main events of the particle system so that custom code could be plugged in to achieve different effects. There are really two main places where it is desirable to change the functionality, being the specifics of the creation of a particle, and the main update routine of each emitter, as it advances all the particles that it owns.

The emitter class becomes something like this now:

//
struct sEmitter
{
    // called whenever a particle is created
    void (*onCreate)( sEmitter *e, sParticle *p );
    // called once each frame to advance the particles of this emitter
    void (*onTick )( sEmitter *e );
    // particle list
    sCluster *firstCluster;
    // emitter details
    float x, y;
    float age;
};

In practice there were a few points that made the implementation not quite as simple as this, but at a high level this strategy works very nicely for me. I did in fact take this strategy much farther then this, but after using it in the engine, this is actually all that really needs to be implemented for a nice, flexible particle system.

Unknown's avatar

Particles In Place

Here we are, I have now integrated my particle engine into the main code of Tengu.  As a preliminary test, I wrote and implemented some quick test emitters to create splash effects when the player jumps and lands.  It looks fairly neat if I do say so myself.  I will add some tile set rendering code in the next few days as well as adding wall jumping ability before posting up a downloadable demo.  I could use all the feedback I can get to help me achive my goal of having the controls as spot on as possible.  Everyone seemed united in their opinion that Ninja Flare for Ludum Dare had horrible controls, so I want to get that right this time.

Unknown's avatar

Stochastic Saturday

The next thing on my list is to create a really nice particle system with loads of options for all kinds of dynamic effects.  It seems that particle systems are also really easy to program at a basic level, but much harder to get right.  For my purposes, the particle effects I will program will rely almost entirely on randomness, and some generic parameters to control their evolution.  Things like particle age, direction, velocity, size, etc, will all use varying amounts of randomness, to keep the effects unique and interesting.  The logical starting point for this system is to ensure that we have a good, clean, way of quickly generating random numbers.  If you do some trawling of the web you may find something like this function:

static signed int _randSeed_a = 7919;

// rand -1 -> +1 - uniform dist
float randf_a( void )
{
    const float fact =  4.6566129e-010f;
    _randSeed_a *= 87103;
    return (float)_randSeed_a * fact;
}

The above code shows a reasonable, and exceedingly simple random number generator.  We have an accumulator or a seed as it is commonly called, which here starts off as a prime number, and each time we call the random function, we multiply that seed by another large prime number.  Due to the nature of primes, we can expect that this seed number will not repeat any time soon.  Our seed value will now jump around randomly within the range of values that an integer can take, which is a hell of a large range.  In the second stage, we simply scale down this range to fall somewhere between -1 and +1.  That range is particularly nice to work with because typically in a particle system we want to generate random numbers in a known range, therefore we can multiply our random number by a constant that acts as our maximum value.

I made a quick and dirty program to test and plot the distribution of this random number generator, as can be seen below:

ImageThe above image is not the most intuitive thing to look at so let me take a moment to explain it.  Here we see the percentage chance that a number generated by the above random number generator will fall into a certain column on the x axis, in this case there are 320 columns; Left most representing -1.0f, middle 0.0f, right most obviously 1.0f.  The percentages seen in the graph were constructed after examining the distribution of 60’000 random numbers.  Every column here has a value around 0.3%, which is what I would expect, since 100% / 320 = 0.31%.  We can infer that there is a nice even probability of all numbers being outputted by this random number generator.

There are many ways to test for randomness and testing the distribution for any bias is just one, however this is important for us as we shall see.  We can actually generate many useful effects for use in games on a whole not just particle systems, by skewing, or adding bias to our random number generator.  An extremely useful distribution is what I will reffer to as a pinch distribution (I have no idea what it should be called) where there it is more probable to receive a random number nearer the value 0.0f.  This can be useful when you want to add an amount of error to something while favoring small errors over large ones.  A nice application of pinch randomness can be seen when it has been added to the firing direction of someones weapon in a game,  providing a nice simulation of aiming error.

ImageThe pinch distribution is actually extremely easy to generate, and is aided by our range being from -1 to +1.  If we multiply our random number by the absolute value of itself, then we essentially suck the distribution in around the zero point.  The code can be seen below, as well as a some bit-wise hacking to make a floating point value positive.

static signed int _randSeed_a = 7919;

// rand -1 -> +1 - pinch distribution
float randf_c( void )
{
    const float fact =  4.6566129e-010f;
    _randSeed_a *= 87103;
    float a = (float)_randSeed_a * fact;
    int   b = (*((int*)&a) & 0x7FFFFFFF);
    float c = *(float*)&b;
    return a * c;
}

Sadly I wasn’t smart enough to figure out a way to create a nice bell curve, or Gauss distribution, but I did manage to make something truly weird, that will be great in my particle system.  I present, “the bowl” distribution:

Image

With bowl distribution, it is vastly more probably that the random number will be nearer -1 or +1 rather then 0, and I bet this will come in useful when I want a strong polarity in my randomness.  The equation for the bowl distribution was taken and reworked from my sine approximation library and is:

y(x) = 4 * x * (1.0f - abs( x ) )

Another alternative to the pinch is:

y(x) = x * x * x

Which provides a vastly larger peak around the 0 value of around 9.5% probability with the above program.  I am sure there are many more cool distributions out there, and I will incorporate them into the particle system as I find them.

Unknown's avatar

Tengu Engine

So my latest coding spree has brought me here, to a very early build of what I have dubbed the Tengu Engine.  For the time being I am not using any of my ninja sprites, but that is just a minor point as it was simply easier to develop the build using that player sprite.  Tengu engine combines lots of the features that I have mentioned so far in this diary, and some that I have not.  The frame rate limiter is working nicely in the background as well as the collision system and the ray casting code from my previous posts. In this little demo, the player movement is constrained entirely by the previously developed collision system and I also the crappy little shadow effect that is projected on the ground uses a ray cast. Since my last post I have developed a nice entity management system as well as a really, damn nice scripted animation system.  Each of these features will be explored in much more detail in the coming days, especially the animation system, but at this stage my intent was to show the current state of progress.

Unknown's avatar

Treatment To Cure A Broken Time Step

I discovered in the final hours before submision of my Ludum Dare entry, Ninja Flare, the full horror of using a variable time step rather then a fixed time step scheme.  What am I talking about?  Well, the time interval between rendering two frames or between successive updates of the game world is entirely in the hands of the programmer.  As the time between these events change, so the speed that the game plays will change.  How do we ensure that the speed of the game appears and feels constant between different computers.  To find a nice solution, lets explore this problem from the beginning and build up. The most basic inner loop of any program can be seen below:

while ( running )
{
	clearScreen( );
	updateGame( );
	drawGame( );
	flipToScreen( );
}

It is natural to follow this kind of program flow, but there is no consideration for the effects caused by the change in speed of the machine.  The game will run at a speed determined entirely by how quickly it can execute this loop.  This leads to the horrible situation where, the game might play beautifully on the programmers computer, but someone running it on a faster computer, aging hardware or a stressed computer will experience something very, very different.  There are two common solutions to handle this problem. The first solution is to find a way to ensure that we only execute the updateGame() procedure, at set intervals of time, and not faster or slower then this.  The second method is to scale all of the movements in our game so that they happen in proportion to real world time.  The first method is called a fixed time step scheme, and the second is referred to as a variable time step or delta time scheme.  Lets have a look at some of the advantages and disadvantages of each method.

A fixed time step scheme is by far the simplest method to program, as we will see shortly.  All of the logic of the game can be hard codded, safe in the knowledge that the game will update at the same rate, all the time.  When using Newtonian physics in a game, as is so common, many of the methods for integration used to advance the movement of objects, are extremely sensitive to changes in time step.  This is because, the smaller the time step for these integrations that is used, the better the accuracy of the simulation will be.  If we have even just one frame with a large time-step, then large errors can instantly ruin the movements of your objects.  A common symptom of this kind of error is objects that fly through walls or just objects that seem to vanish instantly, being a situation called simulation blow up.  An example is shown below:

// start off with the current time
float oldTime = getTicks( );

while ( running )
{
	// find the time scale
	float newTime = getTicks( );
	float scale   = (newTime - oldTime) / 1000.0f;
	      oldTime = newTime;

	clearScreen ( );
	updateGame  ( scale );
	drawGame    ( );
	flipToScreen( );
}

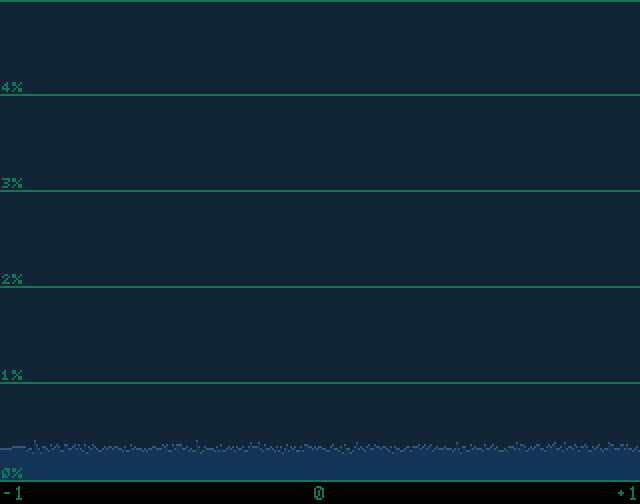
This may look simple but there are many devils lurking in the details.  This computes a variable ‘scale’ that provides a floating point scale between updates relative to a one second period.  The faster the loop updates the smaller this value becomes,  thus scaling all movements by this value should in theory lead to the appearance of a constant movement speed regardless of the execution speed.  This leads to the horrible situation where ‘* scale’ will show up in every line of code, reducing readability, which is something that should not be underestimated.  Also it becomes tricky to integrate this with Newtonian physics, when applying forces, impulses and the like, regardless of the blow up situation described earlier.  Some major advantages to using a variable time step however is that the game will appear to look and feel smoother on a faster computer as well as putting every execution of the main loop to good use, since we are always advancing the game state.  There are many articles online, covering the advantages and disadvantages of this technique, as well as ways to make it more robust.  There are methods to minimize explosions, through filtering the scale time, over a few frames, or limiting the range of this variable all together, all of which I have tried myself.  I have had my fingers burned with this technique however so I want to explore the fixed time step approach for my game.

A very naive implementation of a fixed time step approach is shown below:

//
      int time     = getTicks( );
const int interval = 16;

while ( running )
{
	while( true )
	{
		// find time since last intervall
		int dt = getTicks( ) - time;
		// have we waited long enough
		if ( dt >= interval )
		{
			// advance one interval
			time += interval;
			// exit the stall loop
			break;
		}
	}

	clearScreen ( );
	updateGame  ( );
	drawGame    ( );
	flipToScreen( );
}

It may look complex but in reality the concept of a fixed time updater is very simple; we simply sit in a useless while loop until it is time to process the next frame.  It is extremely wasteful of a computers resources, since we literally do nothing for long periods of time, just wasting CPU cycles.  Worse still, the operating system has no way of knowing that we are just wasting time, so it cant do anything useful with this time.  If you look at the CPU usage for an application using such a strategy, you will see it is extremely high, independent of the complexity of the game itself.  This is in fact worse then the variable time step method shown above, since at least then cycles can be given back to the operating system while waiting for vertical blanking period in the ‘flipToScreen()’ function.  Let me present another version that will try to make this fixed time step a little more efficient in this respect.

//
      int sleepThr = 6;
      int time     = getTicks( );
const int interval = 16;

//
while ( running )
{

	clearScreen ( );

	while( true )
	{
		// we can do things that are not effected by execution speed
		processWindowMessages( );
		// find time since last intervall
		int dt = getTicks( ) - time;
		// if we are too fast then give cycles back to the OS
		if ( dt < sleepThr )
			sleep( 1 );
		// have we waited long enough
		if ( dt >= interval )
		{
			// advance one interval
			time += interval;
			// exit the stall loop
			break;
		}
	}

	updateGame  ( );
	drawGame    ( );
	flipToScreen( );
}

The situation with this fixed time step scheme is a little more forgiving then the previous one.  I included a method to give cycles back to the operating system, when we can be sure that they wont be needed.  This is done through call to the ‘sleep()’ function, which in reality can be ‘SDL_Delay(1)’ if using the SDL library.  It is important to realize that any call to a sleep function cannot be guaranteed to only last for the time that was specified, since there are many factors the OS has to deal with that could delay control being given back to our application.  That is why I ask to delay only for one millisecond, since this can in fact last up to somewhere around 10 milliseconds in practice, although it could potentially be much higher.  We can also do many useful housekeeping tasks with our cycles that are just sitting waiting to be burned, for instance, that is an perfect place to process window messages.  We could even update any game scripts during this time,  later updating any that still need to be executed during the actual ‘upadateGame()’ call.  Also by placing the clear screen call before the burn loop, we can come much closer to presenting the next frame to the screen as soon as possible.

One problem still persists however, and exists in the variable time step code too for that matter.  If we were to debug any of these applications, then as we step out of the debugger to continue the program, we would see the game played in fast forward for a time proportional to that spent in the debugger.  Why does this problem occur?  It happens because while we debug the program, our difference in time since the last frame was processed grows massively.  The game then falls through the burn loop until it has processed enough frames to catch up with the current time.  This is a big problem, essentially ruining the game upon stepping out of the debugger.  We could fix this by changing a single line of code, but I do not recommend this method:

// have we waited long enough
if ( dt >= interval )
{
    // bad way to advance one interval an avoid debug problem
    time += dt;
    // exit the stall loop
    break;
}

This method can introduce errors since we now present a new frame “no quicker then our interval time”, but it could be longer, since errors that slow us down wont be corrected for.  This gives us a situation where the game could jump and stutter, giving us a slowing effect.  We can do much better then this by introducing a hard limit to the time between updates, by adding the following code:

//
      int sleepThr = 6;
      int time     = getTicks( );
const int interval = 16;
const int blowThr  = 32;

//
while ( running )
{

	clearScreen ( );

	while( true )
	{
		// we can do things that are not effected by execution speed
		processWindowMessages( );
		// find time since last intervall
		int dt = getTicks( ) - time;

		// account for condition where the timer just wrapped around
		if ( dt < 0 )
		{
			time = getTicks( );
			continue;
		}

		// if we are too fast then give cycles back to the OS
		if ( dt < sleepThr )
			sleep( 1 );

		// limit our max lag time
		if ( dt > blowThr )
			// just come right up to current time
			time += dt;

		// have we waited long enough
		if ( dt >= interval )
		{
			// advance one interval
			time += interval;
			// exit the stall loop
			break;
		}
	}

	updateGame  ( );
	drawGame    ( );
	flipToScreen( );
}

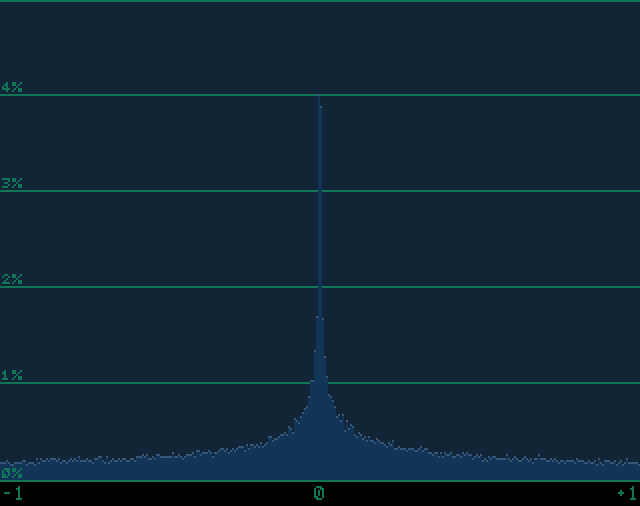
The time step routine is thus much more robust now to situations where the time to process a frame is far greater then we anticipate for.  It recovers from this situation, by simply resetting the time stepper, and proceeding as normal.  We have thus created a nice situation where the game may not proceed any faster then a given time and if it advances a little slower, then it has a chance to catch up.  If it proceeds far slower however then the game just proceeds regardless and attempts to time step again after this worst case.  I also added code to account for one small error condition that has so far not been mentioned.  If the tick timer gets too large, it has the potential to wrap around,  thus causing a situation where, dt, would become negative, where upon it is obvious to see that it would meet the “dt < sleepThr” condition and appear to permanently sleep.  We can easily reset the time stepper if dt were to ever go negative, and at worst get a frame long stall.

This is the current time stepper that I will use as part of my game.  As far as I can see it should perform quite nicely, but the proof is in the pudding as they say, so lets just hope it stands up as well as the theory seems to when it is put into use.

Unknown's avatar

Raycasting For Fun And Profit

One of my ambitions for a while was to create my own efficient ray casting function which I finally managed yesterday, which is great news because ray casting has so many cool applications.  There are so many basic uses for ray casting, for instance, in line of sight detection in the field of AI, detecting the collision points when shooting bullets and importantly for my game, detecting where to attach grappling hooks.  More advanced uses could be in inverse kinematic routines, procedural animation systems or even, as I eventually want to try, Wolfenstein style 2.5D ray-casting engines.  With some extensions It should be possible to modify a ray-casting algorithm to perform somewhat naive Voxel rendering, which is something else I really want to try.  Ever since I played Voxatron, I have since fallen in love with Voxels and its on my large project list to make something simmilar.

Over the last few years I have studied a large number of ray-casting algorithm available on the web and read many websites on the subject.  I would be lying if I said I really understood all of the approaches I have seen to ray-casting, but it is clear that the efficiency of them varies quite substantially, and in this regard they are easily examined.

Perhaps the most understandable and readable tutorial for ray-casting I could find was here, in article by Lode Vandevenne.  On the face of it, his algorithm seems very efficient and he talk in detail about the efficiency and speed concerns, and even in the main loop there is no multiply or divides used.  However, in exploring the code we can see that to initialize a ray cast, two square route functions are called, which adds up when you consider that two called are made for each vertical column of the screen.  Thus even at 320×240, 640 square route calls are made in rendering one frame.  Square route calls can be optimized somewhat by approximation, or look-up tables, however this seems still like a weak point of the algorithm.

Another nice tutorial can be found here, written by F. Permadi.  In his tutorial he advocates mostly the same strategy as the above, but the formers square route calls are now replaced with a call to the tangent function, shown here.  This is more efficient, since the tangent function can easily be packed into a look-up table and accessed quite efficiently, just as I did for my sin wave approximation library.  Still this look-up costs space and has accuracy tradeoffs thus reducing the overall efficiency in other ways.

For my algorithm, I managed to avoid square routes and look up tables of any kind, in fact there are just four divides and six multiplies called for each ray cast, the rest being just addition and subtraction. The inner loop is entirely performed using addition and subtraction also, so the overall efficiency seems bloody high.  I do however test inside the inner loop to see if the ray has exited the map space, but if we can guarantee that a ray will hit a tile (such is the case, when the map is surrounded by tiles) then efficiency could again be dramatically increased by omitting these tests.  In the code below that I provided, you will find there is one multiply in each inner look, to perform the wall hit test, but this can be optimized away to equivalent addition and subtraction, as I have done in my own personal version.  In my scheme unlike that of Lode, I separate the ray cast into two stages, that of ray casting over the x-axis and next the y-axis.  Each of these steps may produce a hit, and at the end of the algorithm we can compare the squared distance to efficiently select the closest of the two hits.  I also break the ray cast through each axis into two parts, that for a positive increment, and that of a negative, since we can tailor the inner loop to be more efficient for each case.

I am sure this ray casting code will find loads of awesome use in Ninja Flare as well as my other projects.  I also need to find a better name for the game, other than Ninja Flare, which was chosen quickly for the deadline of Ludum Dare.

Source Code:

raycast.cpp

Unknown's avatar

The Resolver In Depth

Included below are snippets of the main body of the solver.  Using two for loops that surround the main body of code, we can traverse all of the tiles that are overlapped by the object being tested. {x1, x2, y1, y2} are used as the limits in the for loops, with {x1,y1} being the upper left extreme tile overlapped of the object being tested, and {x2,y2} being the lower left tile.  The first step taken inside the loop is to index the tile map data and pull out the 8bit value that represent the current tile at [x,y] in tile space.  Each tile in my game is an encoding of bits that specify that tiles properties.  You can see that { cWall, cQUpper, cQLower, cQLeft, cQRight } are all bit masks that can be tested against a tile. The bit mask encoding is defined as this:

// useful macro for encoding single bits
#define BIT( X ) (1<<(X))

// map bit codes
const uint8 cQUpper  = BIT( 0 ); // can push up
const uint8 cQLower  = BIT( 1 ); // can push down
const uint8 cQLeft   = BIT( 2 ); // can push left
const uint8 cQRight  = BIT( 3 ); // can push right
const uint8 cWall    = BIT( 7 ); // is a wall

In the main loop, we can quickly skip over any tiles that are not walls since they don’t contribute in any way to the collision, or a resolution.  There are four directions in which a tile may push an object so as to resolve a collision, being { up, down, left, right }.  In the pre-processing step I have determined which directions are valid for each tile to push, and are encoded for each tile using the scheme above.  So, for each direction the tile can push, we compute a resolution vector that would safely push the overlapping object out of a collision with this tile.  These are stored in the array named ‘quad’, standing for quadrant.  After this step we have an array potentially full of four different resolution values.  A key point to note is that for each tile in the world, we limit it so that it may only push the object in one direction, even if it overlaps on multiple axes.  Therefore a method is needed to decide which axis is best to choose as our resolution.  This is easy in fact, as it is simply that which would move the object by the smallest amount.  The ‘select_from_absmin()’ function is simple but usefull, it simply returns the argument who has the smallest absolute (forced positive) value.  We start off finding the best resolution for each of the two axes, x and y.  Next we challenge these two, deciding if the x axis has a easier resolution then that on the y axis.  Outside of this loop we are maintaining two variables that store the final resolution for each axis, dp_x and dp_y, standing for displacement_x, etc.  If the tile we have examined provides an easier resolution, or a smaller displacement, then we have currently in our dp_?, then we can take the new displacement as our new dp_?.

// traverse all tiles in the collision area
for ( int y=y1; y<=y2; y++ )
for ( int x=x1; x<=x2; x++ )
{
	// extract this tiles value
	uint8 tile = map->data[ x + y*map->width ];

	// skip if not a blocking tile
	if ( (tile & cWall) == 0 )
		continue;

	// four resolution values, one for each resolution direction
	int quad[4] = { 0xFFFF, 0xFFFF, 0xFFFF, 0xFFFF };

	// find all of the resolutions, one for each direction
	if ( (tile & cQUpper) != 0 ) quad[0] =  (y   *ts) - info->y2;
	if ( (tile & cQLower) != 0 ) quad[1] = ((y+1)*ts) - info->y1;
	if ( (tile & cQLeft ) != 0 ) quad[2] =  (x   *ts) - info->x2;
	if ( (tile & cQRight) != 0 ) quad[3] = ((x+1)*ts) - info->x1;

	// select smallest resolution for each axis by comparison of their abs min
	quad[0] = select_from_absmin( quad[0], quad[1] );
	quad[2] = select_from_absmin( quad[2], quad[3] );

	// select the smallest resolving axis for this tile
	if ( absi( quad[2] ) < absi( quad[0] ) )
	{
		// x - axis
		// save it if smaller then our current resolution
		if ( absi( quad[2] ) < absi( dp_x ) ) dp_x = quad[2];
	}
	else
	{
		// y - axis
		// save it if smaller then our current resolution
		if ( absi( quad[0] ) < absi( dp_y ) ) dp_y = quad[0];
	}
}

By the end of this process we may have two displacement values for each axis, dp_x and dp_y, and they can simply be returned to the calling function.  The algorithm itself is quite simple and easy to visualize when you are familiar with it.  It shows good robustness when given small interpenetration depths, of perhaps 1/3 of a tile size.  In reality this is quite acceptable, since it would be rare to suddenly have a character in a game penetrate the world geometry beyond that much.  Only at extreme velocities would we penetrate more then this amount, but then we can perform actions to guard against it, such as testing for collisions over fixed distances, so add half of the velocity and test, then the second half and test again.  Essentially that would be a subdivision scheme.  In other situations we can perform ray casts to instantly compute a collision location for very fast objects.

Code for the full solver can be read here:

collide.h

collide.cpp